SAML configuration
Overview
Single Sign-On (often called SSO) is a way for users to log in to several different applications using just one username and password. With SSO, you don’t have to remember multiple passwords for different tools—one login gives you access to everything you need.
SSO is commonly used in companies with many users and many applications, as it makes logging in easier and more secure.
Common SAML Terms
SAML is a technology standard that helps SSO work. Here are some important terms you’ll see when setting up SSO with SAML:
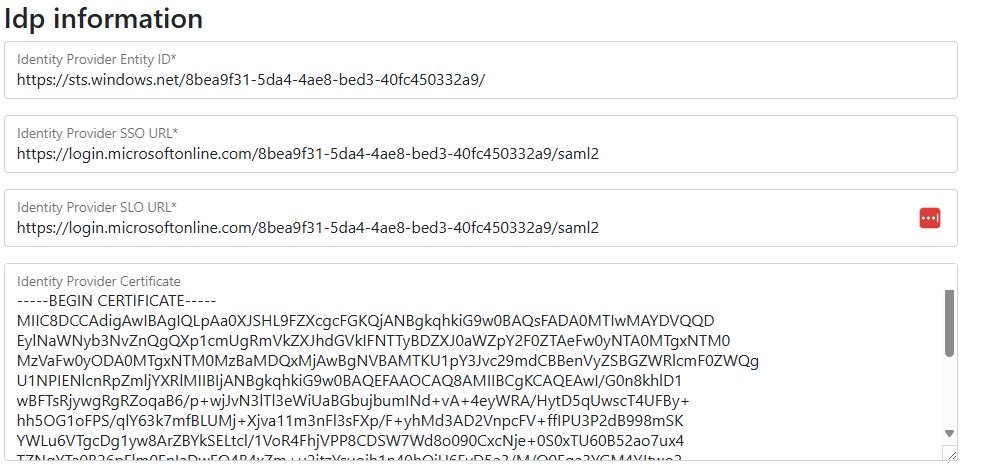
Identity Provider (IdP)
The Identity Provider is the system that checks who you are when you log in. It’s the “gatekeeper” that confirms your identity and lets you access other applications.
Service Provider (SP)
The Service Provider is the application or tool you want to use. In this case, it’s the part of our platform that handles logins.
Entity ID
An Entity ID is a unique name or URL that identifies either the Identity Provider or the Service Provider. It helps the systems know who they’re talking to. For the Service Provider, this is usually a special URL that’s created automatically.
Assertion Consumer Service (ACS)
The ACS is a web address (URL) on the Service Provider that receives login information from the Identity Provider after you sign in.
Metadata
Metadata is a file (in XML format) that contains important information about either the Identity Provider or the Service Provider.
Service Provider Metadata: This includes the Entity ID, security certificates, logout URL, and ACS URL. You can find the metadata for our platform in System > Single Sign-On.
Identity Provider Metadata: Your Identity Provider can also provide metadata to help with setup.
What is SAML?
SAML (Security Assertion Markup Language) is a standard way for different systems to share login information securely. It lets your Identity Provider (like Microsoft Azure AD) and our platform (the Service Provider) communicate safely so you only need to sign in once.
How to Set Up SSO
Setting up SAML-based SSO is a process where you connect your authentication system (Identity Provider) to our platform (Service Provider). You’ll need the right permissions to manage SSO settings.
- Gather Information from Your Identity Provider Before you start, you’ll need some details from your Identity Provider. Your IT department or SSO administrator can give you this information.
- Activate Single Sign-On To turn on SSO, simply click the “SSO enabled” button in the platform’s settings. Once it’s on, all login requests will be sent to your Identity Provider.
- Configure the Identity Provider Section
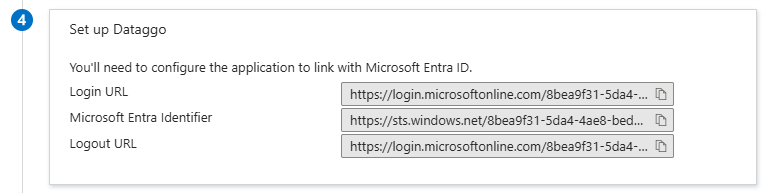
Fill in the required fields using the information from your Identity Provider:- Entity ID: The unique URL or name for your Identity Provider (provided by your IdP)
- Sign-on URL: The web address users go to when logging in
- Logout URL: The web address used when users log out
- Public Certificate: This is needed to keep communication secure.
- Configure the Service Provider Section
 This part is filled in automatically the first time you visit the SSO settings page.
You’ll see:
- Entity ID: The unique name or URL for our platform (you’ll need to give this to your Identity Provider)
- Service Provider Certificate: These are used to encrypt and protect messages.
- Metadata URL and ACS URL: These are shown for your reference and can be copied easily.
Note: The Service Provider’s certificate is self-signed by default. You can see when it expires in the interface. When it expires, you’ll need to renew it.
How to disable SSO
To turn off SSO, click the “SSO enabled” button again. After disabling, users will log in using the regular login page.
Tips and Tricks
About Users Once SSO is active, users’ passwords stored on the platform are no longer used.
If a user logs in for the first time and doesn’t already exist, the platform will create their account automatically, based on the information sent by the Identity Provider.
Bypassing SSO for Admins If you enable this option, users with the “Admin” role can still log in with a password. This is helpful for setup or if SSO isn’t working (for example, during maintenance).
About User Claims User claims are pieces of information the Service Provider needs from the Identity Provider during login. These are required for SSO to work properly. Your SSO administrator must set up the Identity Provider to include these claims:
- email: Used to identify and create users if needed.
- groups: Used to assign the right access within the platform.
Check your Identity Provider’s documentation for how to set up these claims.
- Microsoft Entra ID (Azure Directory) step-by-step configuration: Azure SSO example
- Google Workspace step-by-step configuration: Google SSO example